
Garden ponds are a refreshing means of encouraging healthy wildlife growth in your yard or outdoor living space. They also add an aesthetic and ornamental touch to your living space. Keep reading to find out more about how to make a pond using minimal items when you are living off the grid. If you also want your yard to look more green, you may start growing a lawn with the help of lawn care services.
How to make your pond?
It is a good idea to begin working on creating a pond during summer or spring as this will allow you to gauge how the pond that you have created interacts with the ecosystem in your yard. After all, water attracts wildlife most in the growing season. However, it possible to make your pond any time during the year. Depending on how cold winter gets where you live, you may not be able to witness the enchanting beauty of a low-maintenance pond with its fish, pond skaters, frogs, aquatic plants and birds. Plus, there is nothing more refreshing than enjoying a chilled drink next to your pool in summer, even if you are living off the grid!
Here is how you can make a pond using minimal items:
Find a container
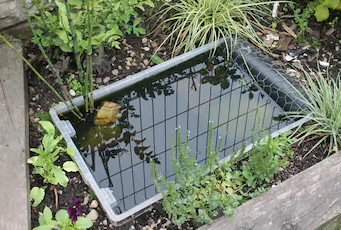
Container pond.
Your mind may intuitively decide that it is a good idea to dig a hole in your yard if you want to build a pond, but using a container is a safer option. Digging requires buying expensive equipment, which may not be a feasible choice if you want to use minimal items to create your pond. If you live in a climatic zone where it rains a lot, rainwater may collect in the hole you have dug to transform your pond into a muddy swamp. You do not want this to happen to you!
Instead use a large empty container such as:
- Butler sink
- Shower tray
- Half-barrel
- Washing bowl
- Tubs and plant pots
Make sure that the container you choose is broad and deep enough for the location you have planned to put it. Inspect the strength and durability of your container to ensure that it can withstand the weight of water and the harshness of frost. If your container is made of metal, stone, fiberglass, Emperor Marble large marble tiles or plastic, then you will not run into problems. Finding a good Marble Supplier is important to make sure you get good quality tiles. Avoid using containers made up of porous materials such as granite.
Placing your container
Before you can fill your container with water, you need to find an appropriate location to put it! It will be tricky to keep moving your pond from one place to another after it has been filled with water as the weight will make it heavy. Choose a location that gets partial sunlight or only a few hours of direct sunlight. Shortwave radiation from the sun carries a large amount of heat energy that can warm up your pond and steal the water stored in it. Excess heat can also damage your pond container and cause it to wear down quicker than it should, mostly if it is made from plastic.
Note: Choose a pond location such that your pond does not become a safety hazard. Avoid going for an accident, injury and burn pit compensation. Adults and children can trip over your pond and hurt themselves!
Get your pond ready
It would be best if you prepared your pond before it is ready to hold the weight of water and be put outside in your yard. For example, you need to thoroughly inspect your container for any holes or tears that may cause leakage. For pots and plastic containers, you can use silicone sealant glue lying around your kitchen to seal gaps. If your container is made up of glass, then hardener fingernail polish may be enough to get the job done. Note that this technique only works if the hole is small. If the leak or tear in your container is too big, you might have to ditch it altogether and find a new one.
Get your creative juices pumping and improve the overall design aesthetic of your pond. You can use acrylic paints to draw creative patterns on the exterior of your pot. Spray paints work just as well in getting the job done! ! Use pastel colors such as coral pink and light blue to capture the perfect summer vibe. Work with paint contractors for a flawless job. Living off the grid does not mean you do not get to have fun! Once your pond is ready, you may introduce tiny ornaments and figurines to add an artistic flair to your outdoor pond.
Time to fill up your pond
It is recommended that you use rainwater to fill up your pond as tap water contains unwanted chemicals minerals, radionuclides, pesticides, and other solvents. If you do not have rainwater available, then you can use tap water but remember to perform a chlorine treatment. Letting your tap water rest on a window sill for a day or two will allow chlorine and other unwanted solvents to dissipate so that they do not bother your pond wildlife. Depending on the size and location of your pond, you may use an electric pump to fill it up. Just be careful not to waste water in the process!
Add plants to your pond
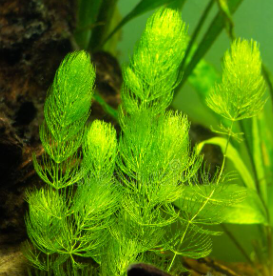
Hornwort in water help ponds remain clean.
You can attract wildlife to your pond my introducing a few aquatic plants to your pond. Submerged pond plants such as hornwort, watermilfoil, and parrot’s feather are useful in releasing oxygen in underwater to discourage the growth of algal blooms. Using native plants is a good idea because they will not struggle to adapt to the living environment that your pond offers. Do not introduce too many aquatic plants to your pond as they may suffocate the space where your plant has been placed.
Conclusion
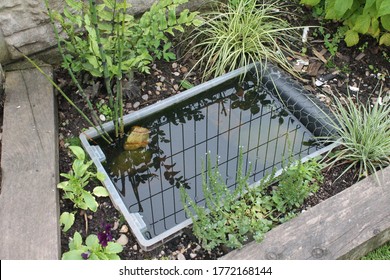
Setting up a container pond is easy!
You do not have to pay for expensive equipment and procedures to make a pond when you are living off the grid. You can make your pond by using minimal items that are lying around the house!
Image links
https://sunlandwatergardens.com/wp-content/uploads/2014/01/Small-container-water-gardensmall-ponds1.jpg
https://thumbs.dreamstime.com/b/hornwort-plant-ceratophyllum-demersum-fish-tank-179873471.jpg
https://image.shutterstock.com/image-photo/diy-tiny-garden-pond-made-260nw-1772168144.jpg


